

 There are several ways you can take screenshots on a Mac. Preview offers the option from its File menu. There's also a little screen capture app in the macOS Utilities folder called Grab. But the simplest and most common method is to use your Mac's built-in shortcut key combinations. Taking a screenshot is as easy as hitting Shift-Command-3 to capture the whole screen, or Shift-Command-4 to capture a portion of the screen using the mouse cursor as a crosshair selection tool (a tap of the spacebar also turns it into a camera for capturing windows).
If you tack the Control key onto either of these shortcuts, macOS copies the captured image to the clipboard, which is useful if you want to paste it into an application that can edit or view images. Otherwise, screenshots taken using key shortcuts are saved straight to your desktop. If you'd like to change that default save location to somewhere different, simply follow the steps below. You can also change the default file format that the screenshots are saved in by following these steps. The last section of this article offers some tips for taking more control of your screenshot selections, so be sure to check those out too.
How to Change Where Screenshots Get Saved in macOS
- Open a Finder window and press Shift-Command-N to create a new folder where you want your screenshots to be saved. Click the folder's name if you'd like to rename it.

- Launch the Terminal app (found in Applications/Utilities).
- Type in the following command and then press the spacebar, but don't hit Enter just yet: defaults write com.apple.screencapture location
- Now drag the folder you just created into the Terminal window. The folder's path should appear after the command you typed in. Press Enter.
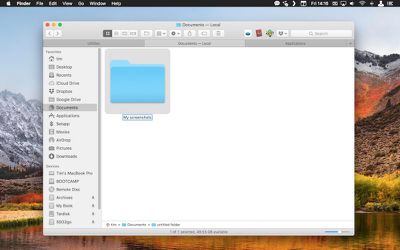
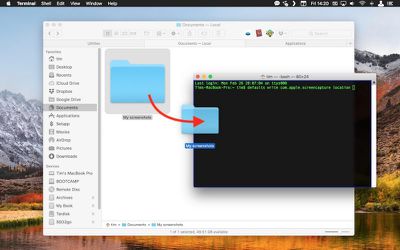
Your captured images will now be saved in the designated folder whenever you use the screenshot shortcuts. Note: Do not delete this folder until you've changed the save location to somewhere else using the same Terminal command, or you'll run into issues. If you want to switch things back in future so that images are saved on your desktop again, simply input the Terminal command as above, but change the path to ~/Desktop.
How to Change the Default File Format of Screenshots
- Launch the Terminal app (found in Applications/Utilities).
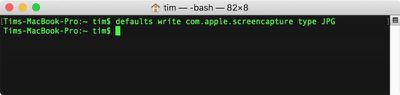
- To change the screenshot format to JPG, TIFF, GIF, PDF, or PNG, type in the command defaults write com.apple.screencapture type followed by a space, and then type the relevant format suffix. (We've used JPG in the example below.)
- Press Enter.
- Test if the command has been applied by taking a screenshot with Shift-Command-3. If the image is still being saved in the previous format, restart your Mac manually, or reboot by typing the Terminal command killall SystemUIServer and pressing Enter.
Tips for Taking Selection Screenshots
Tip: 1 When using the Shift-Command-4 shortcut combined with the spacebar to capture windows, you can eliminate the window's drop shadow from the screenshot by using Option-click instead of regular click.
Tip: 2 When using Shift-Command-4 to grab a portion of the screen, if you misjudge the initial point of your selection, hold down the spacebar before releasing the mouse button and you can reposition the entire selection area.
Tip: 3 When making a selection with Shift-Command-4, press the Option key before releasing the mouse button and move your mouse around to resize the dimensions of the selection area from its center point.
Tip: 4 When expanding a selection area with your mouse, hold down the Shift key to lock the dimensions of the area except for the direction that you're presently dragging in.
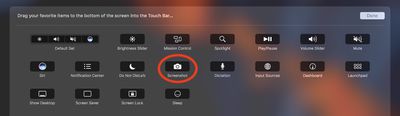
Bonus Tip: If you have a MacBook Pro with Touch Bar you can customize the Control Strip region to include a Screenshot button with selection options. Simply select System Preferences -> Keyboard -> Customize Control Strip, and drag the button onto the Touch Bar area.




















Top Rated Comments